
We Planned Your Next Disney Dinner Party — You’re Welcome 😉
If anyone knows how to host a dinner party, it’s Disney. We would LOVE to be invited to an event hosted by Lumiere and Cogsworth from Beauty and the Beast. Or maybe Tiana would have us over for some beignets? And we’d certainly never turn down a meal cooked by Remy! So it’s no wonder we turn to Disney when we’re looking to plan the PERFECT event.

Tiana would throw an AMAZING dinner party
We’ve compiled a list of the best Disney-themed recipes that you can use at your next dinner party! We’ve got all the info you need to craft the perfect meal, along with some helpful and fun products that will complement the spread. Roll up your sleeves, grab those aprons, and let’s get started!
We’ll go through each course of a dinner party (yes, we’re making this a 3-course event) with a couple of options for each and some Disney products that might help you out while you cook and serve.
Appetizers
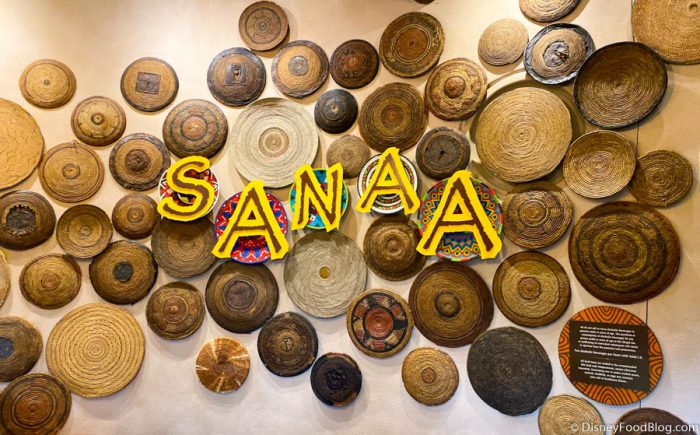
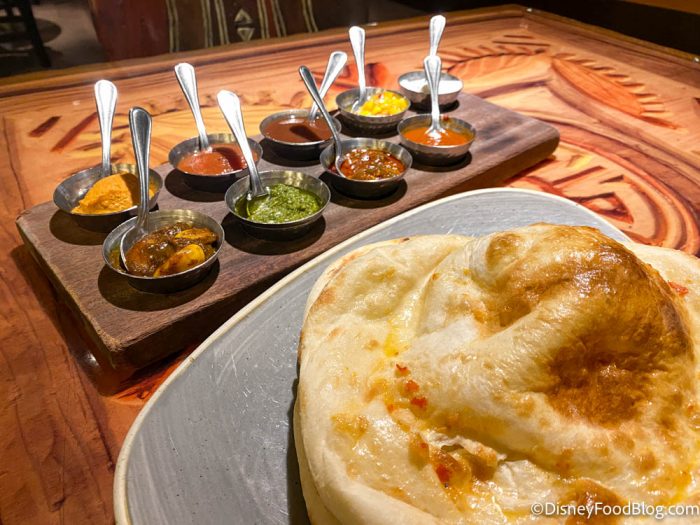
This first recipe comes from Sanaa, which is a table service restaurant located at Disney’s Animal Kingdom Lodge. Sanaa is known for unique (and delicious) African-inspired dishes, and one of the most popular items on the menu is their bread service!
Time for some sauce with a side of bread!
The service comes with various flavors of naan bread and a LOT of different dipping sauces, but this recipe just has one sauce — Cucumber Raita.
Sanaa Bread Service
Ingredients:
Naan Bread
- 3 2/3 cups all-purpose flour
- 1 tablespoon sugar
- 1 tablespoon coarse salt
- 1/2 tablespoon baking soda
- 1/2 cup milk
- 2/3 cup warm water
- 1 tablespoon canola oil
- 4 tablespoons butter, melted
Cucumber Raita
- 1 1/2 cups Greek-style plain yogurt
- 1 cup cucumber, peeled, seeded, and diced into small pieces
- 1/2 small jalapeño pepper, seeds, and stem removed, minced
- 1/2 teaspoon cumin seeds, toasted and freshly ground
- 1/8 teaspoon cayenne pepper
- 1 teaspoon coarse salt
Bread Service
Method:
Naan Bread
This recipe makes five 8-inch naan breads.
- Combine flour, sugar, salt, and baking soda in the bowl of an electric mixer fitted with the paddle attachment; stir to combine.
- Combine milk, water, and oil in a medium bowl; whisk to combine.
- With mixer running, pour wet ingredients into dry ingredients. As soon as mixture comes together, switch attachment to a dough hook and mix until dough is smooth and no longer sticky. Do not over-mix.
- Cover bowl with plastic wrap and set aside at room temperature for 1 hour.
- Place a pizza stone on a top rack of oven, positioned approximately 6 inches below the broiler. Preheat oven to 500°F for at least 30 minutes.
- Divide dough evenly into 5 pieces. On a lightly floured surface, roll each piece into an 8-inch circle.
- Turn oven to broil. Carefully slide one circle of dough onto the preheated pizza stone, and broil until bread is bubbled and golden brown, about 2 to 3 minutes. Watch carefully, as the bread can burn very quickly. Repeat with remaining dough rounds.
- Brush the warm bread with melted butter and serve immediately.
Cucumber Raita
Makes two cups.
- Combine all ingredients in a medium bowl. Chill before serving

All. The. Dips.
At Sanaa, the dips are served in cute little bowls that each have their own tiny spoon. If you want to serve your own dip in adorably tiny bowls, we found a set of 6 ceramic mini bowls on Amazon!

©Amazon
You can get the set for $13.99.
Click here to buy the little sauce bowls.
Another option for an appetizer is Canadian Cheddar Cheese Soup from EPCOT’s Le Cellier Steakhouse. This steakhouse — located in the Canada pavilion — is famous for this delicious soup.
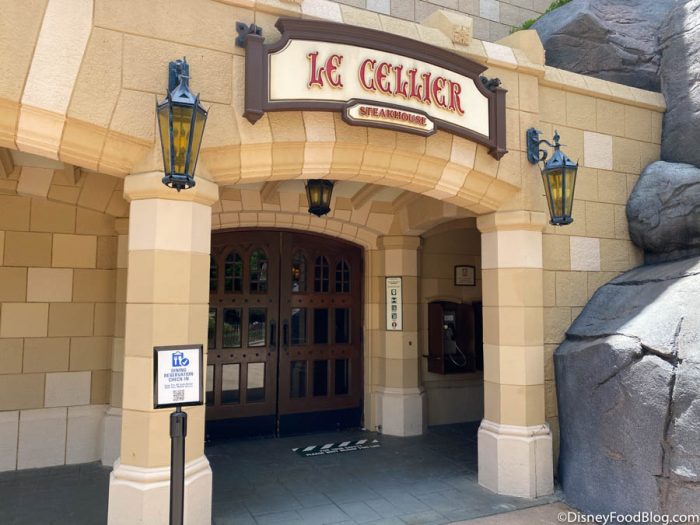
Le Cellier
The soup has bacon, butter, and cheese in it — what’s not to love??
Le Cellier Canadian Cheddar Cheese Soup
Ingredients:
- 1/2 pound of bacon, cut into 1/2-inch pieces
- 1 medium red onion, cut into 1/4-inch pieces
- 3 celery ribs, cut into 1/4-inch pieces
- 4 tablespoons butter
- 1 cup all-purpose flour
- 3 cups chicken stock
- 4 cups milk
- 1 pound white cheddar cheese, grated
- 1 tablespoon Tabasco sauce
- 1 tablespoon Worcestershire sauce
- Coarse salt, freshly ground pepper to taste
- 1/2 cup warm Canadian golden lager or any pale lager-style beer
- Chopped scallions or chives, for garnish

This soup is EVERYTHING
Method:
- In a 4- or 5-quart Dutch oven, start to cook bacon. Make sure to stir it over medium heat for about 5 minutes or until it’s lightly browned.
- Add red onion, celery, and butter. Sauté until the onion has softened for about 5 minutes.
- Add flour and cook your ingredients, stirring constantly, for about 4 minutes over medium heat. Whisk in the chicken stock and bring to a boil for 1 minute. Reduce the heat to a simmer and cook for 15 more minutes, stirring occasionally.
- Add milk and continue to simmer for 15 minutes. Do not boil after the milk is added.
- Remove you soup from the heat and add cheese, Tabasco sauce, Worcestershire sauce, salt, and pepper. Blend with an immersion blender until the cheese is melted and the soup is smooth. Stir in warm beer. If the soup is too thick, thin with some warm milk.
- Garnish your with chopped scallions or chives and serve!
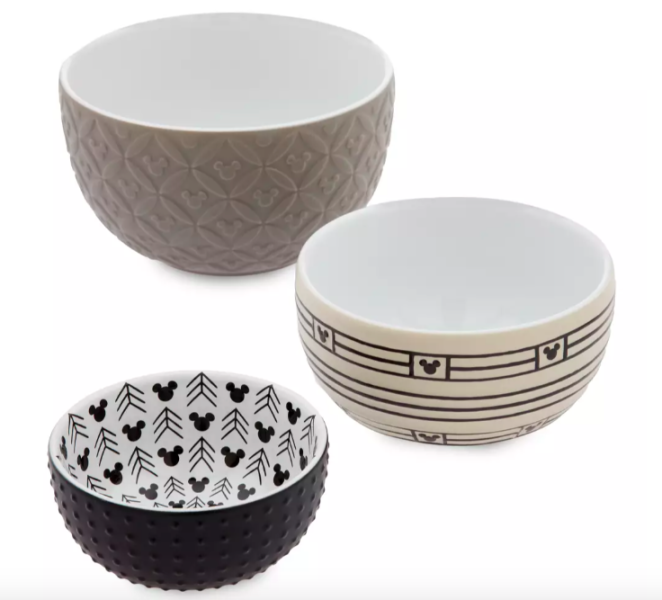
If you need a serving bowl for your tasty soup, we found a set of Mickey Mouse bowls on shopDisney that should do the job.
©Disney
You can get the set of 3 nested bowls for $34.99.
Click here to buy the Mickey serving bowls.
If you’re not sold on the bread service or the soup, you might consider a charcuterie board instead. Lucky for you, we’ve got a list of 3 different Disney charcuterie boards, including an apple one for Snow White and the Seven Dwarfs, one themed to Coco, and a classic Ratatouille-themed one.
Check out the 3 Disney charcuterie board ideas.
And of course you can’t have a charcuterie board without the board itself! To keep the Disney theme going strong, check out this Mickey-shaped cheese board from Amazon.

©Amazon
It comes with the board and a 3-piece tool set, which can be stored inside the board. It’s actually on sale right now as well! It usually costs $66.95, but right now it’s just $56.99.
Buy the Mickey charcuterie board here!
Main Course
Now it’s on to the main course. We’ve got a couple of options for this one as well, including the signature dish from the recently reopened Hoop-Dee-Doo Musical Revue!

Hoop-Dee-Doo Has Returned!
Hoop-Dee-Doo is known for its fried chicken, which is definitely a crowd-pleaser.
Entrée: Hoop-Dee-Doo Fried Chicken
Ingredients:
Brine
- 3 cups of cold water
- 2 tablespoons of garlic powder
- 4 tablespoons of coarse salt
- 1 medium chicken, cut into 2 legs, 2 breasts, 2 thighs, and 2 wings
Fried Chicken
- Canola oil
- Reserved brined chicken
- 3 cups all-purpose flour
- 1 cup cornstarch
- 1 tablespoon coarse salt
- 1 tablespoon paprika
- 1 tablespoon onion powder
- 2 teaspoons ground white pepper
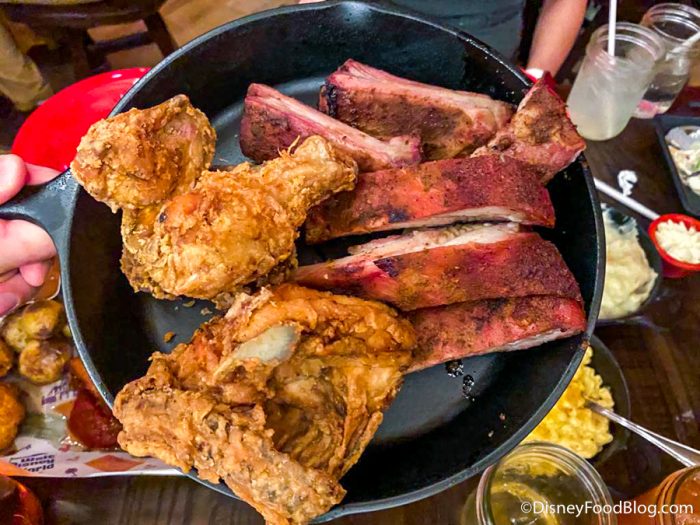
We love that fried chicken!
Method:
- To begin, combine your cold water, garlic powder, and coarse salt in a large glass bowl.
- Add your cut-up chicken, then cover and refrigerate for 8 hours.
- Heat 3 inches of canola oil in a heavy-bottomed pot until it reaches 350°F.
- Take the chicken out of the brine, pat dry, and then dredge it in a whisked mix of your flour, cornstarch, salt, paprika, onion powder, and white pepper in a shallow bowl.
- Carefully place the chicken in the oil and turn once while cooking. Cook breasts for 13-14 minutes, thighs for 9-10 minutes, and legs and wings for 7-8 minutes, or until all pieces have reached an internal temperature of 165°F.
- Drain on paper towels, then enjoy!
And if you’ve ever tried to fry chicken before, you know that you’ll need an apron to keep the oil off your nice clothes. We found an awesome Figment apron on shopDisney that’ll do the trick.

Figment Apron
You can get the Figment apron for $29.99.
Click here to buy the Figment apron.
For a very different option (although it’s still fried…apparently we’ve got a theme going), you can try out Disneyland’s iconic Monte Cristo Sandwich instead. This sandwich has been a staple in Disneyland for YEARS. You can find it at both the Blue Bayou and Café Orleans (where it’s cheaper…shhhh!).

Blue Bayou
The Monte Cristo has been around in Disneyland since 1967, and fans still flock to the park to taste it.
Entrée: Disneyland’s Monte Cristo Sandwich
Ingredients:
- 1 egg
- 1 3/4 cups plus 2 tablespoons water
- 1 3/4 cups all-purpose flour
- 1/4 teaspoon salt
- 1 teaspoon baking powder
- 8 slices egg bread (challah works well), sliced 1/2-inch thick
- 8 thin slices ham
- 8 thin slices turkey
- 8 thin slices Swiss cheese
- 3 cups canola oil for frying
- Confectioners sugar
- Blackberry preserves
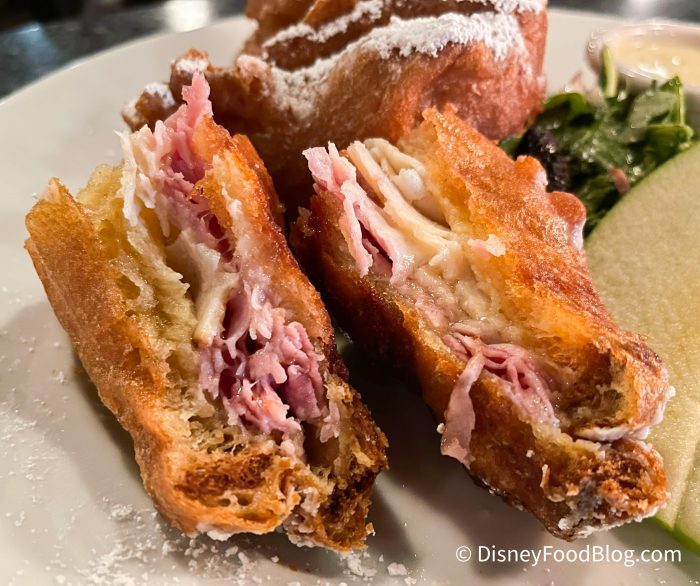
Monte Cristo Sandwich
Method:
- Line a cookie sheet with paper towels; set aside.
- Whisk the egg and water together in a mixing bowl. Add flour, salt, and baking powder and whisk thoroughly for 2 to 3 minutes or until smooth, scraping sides of bowl.
- On one slice of bread, arrange 2 slices of ham, turkey, and cheese, covering the bread evenly. Place another slice of bread on top and slice each sandwich in half diagonally.
- Heat oil to between 365 degrees F and 375 degrees F in a 10-inch pan. Do not let the oil reach a higher temperature than this; if the oil starts to smoke, turn the heat down. Dip half of the sandwich into the batter, allowing excess to drain, and very carefully place into the oil.
- Repeat with the other sandwich half. Cook 3 minutes on each side, or until golden brown. Place the cooked sandwich on the prepared cookie sheet in a warm oven until ready to serve. Repeat with the other three sandwiches.
- Cook one at a time, and allow the oil to reach the desired temperature between each.
- Sprinkle with confectioner’s sugar and serve with blackberry preserves on the side.
As you might guess, any deep-fried sandwich that’s been dusted with powdered sugar and served with blackberry preserves might get a little bit messy. So we found some cute Mickey Mouse napkins to have on hand!

Mickey Napkins
You can get the set of 4 napkins for $19.99.
Click here to buy the Mickey napkins.
Of course, you’ll need a couple of side dishes to go along with the entrées. Check out this recipe for Colombian Cheese Fritters (called buñuelos), which was inspired by Disney’s Encanto.
Side: Colombian Cheese Fritters from Encanto
Ingredients:
- 1 cup cassava flour
- 1/2 cup cornstarch
- 1 cup shredded cheese (ideally queso costeño, but mozzarella or feta will also work)
- 2 tablespoons sugar
- 1 teaspoon salt
- 1/2 teaspoon baking powder
- 2 tablespoons butter (room temperature)
- 1 egg
- 2 tablespoons milk
- 3 cups vegetable oil, for frying

Mirabel from ‘Encanto’
Method:
Makes 32 fritters
- In a big mixing bowl or on a clean, flat surface, add cassava flour, cornstarch, cheese, sugar, salt, baking powder, butter, egg, and milk.
- Mix with your hands until fully combined. The dough should be easy to mold with your hands and not too dry or wet.
- In a medium pan, heat oil on high for about 3 minutes or until it reaches 320-340 degrees F. Then lower the heat to medium and keep it at a constant temperature.
- Divide the dough into 32 equal portions. Roll the dough into balls.
- Fry 3-4 fritters at a time for about 2-5 minutes or until golden brown. They rotate on their own to help themselves cook evenly!
- Place them on a paper towel to drain excess oil. Serve right away.
Another side option has a lot of Disney history behind it. The Au Gratin Potatoes were a signature dish on the Empress Lilly Riverboat, which used to be docked on the shores of what we now call Disney Springs. The boat was named for Walt Disney’s wife, Lillian, who actually attended the Riverboat’s dedication on May 1, 1977. Inside was a jazz lounge and three restaurants, one of which was the fanciest in all of Disney World at the time.

©Disney
This riverboat closed on April 22nd, 1995, and now you’ll find the Paddlefish restaurant in its place (with Fulton’s Crab House existing there before Paddlefish). You can bring back a taste of the original restaurant with these potatoes!
Side: Empress Lilly Au Gratin Potatoes
Ingredients:
- 2 large baking potatoes
- 1 cup half and half
- ½ teaspoon coarse salt
- ¼ teaspoon pepper
- ½ teaspoon celery salt
- 1 tablespoon finely grated onion, optional
- 3 tablespoons grated cheddar cheese
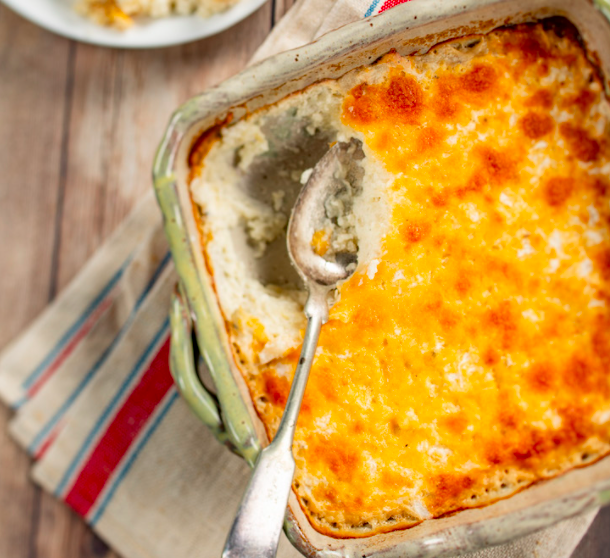
©Disney
Method:
Serves 4
- Preheat oven to 375°F. Bake potatoes 50 to 60 minutes, or until soft enough to pierce with a fork. Refrigerate to cool, then peel and coarsely grate.
- Bring half and half almost to a boil in a small saucepan over medium heat. Add salt, pepper, celery salt, and onion. Mix in grated potatoes.
- Reduce oven heat to 350°F. Spoon potatoes into buttered 1-quart baking dish. Sprinkle with cheese. Bake 15 to 20 minutes, or until browned and bubbly.
To make sure everyone can reach your delicious side dishes, you might want to grab this Winnie the Pooh Lazy Susan from shopDisney.

©Disney
The turntable is about 12″ in diameter, and it says “Every new day is an adventure waiting to happen” with Winnie the Pooh, Piglet, and Tigger in the middle. You can get it for $44.99.
Click here to buy the Winnie the Pooh Lazy Susan.
Dessert
We’ve finally arrived at the most important course of all! We have THREE options for dessert that you could serve at this epic dinner party. The first comes from one of our all-time favorite places to grab a treat in Disney World: Karamell-Küche.

Karamell-Küche
The Gingerbread Cookie Sandwich started off as a seasonal item, but it was so popular that Disney decided to keep it around all year! And now you can make it at home as well.
Karamell-Küche Gingerbread Cookie Sandwich
Ingredients:
- Betty Crocker Gingerbread Cake & Cookie Mix
- 1/4 cup water
- 3 tablespoons butter
- Betty Crocker Whipped Butter Cream Frosting
- Werther’s Original Soft Caramels
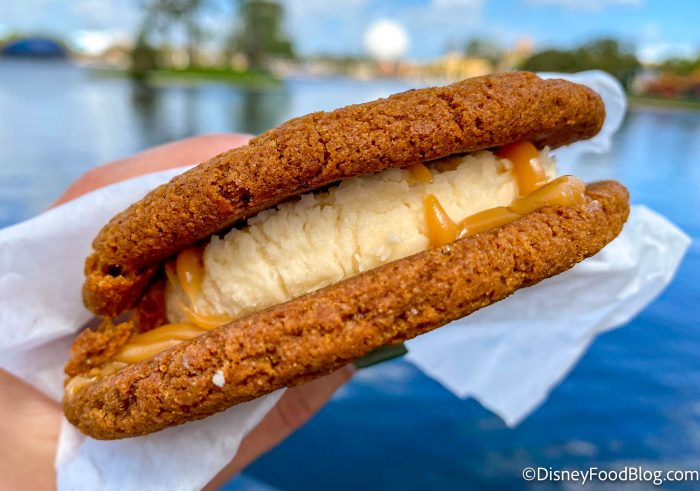
Gingerbread Salted Caramel Buttercream Cookie Sandwich
Method:
- On the back of the Betty Crocker Gingerbread Cake & Cookie Mix, you’ll find instructions for making a gingerbread cake and instructions for making gingerbread cookies. We’re going to work off of the bottom recipe for making gingerbread cookies.
- So grab that measuring cup you have handy and fill it with a quarter cup of water and cut up three tablespoons of butter. The box calls for the butter to be melted, but for a denser dough texture, just use softened butter that’s room temperature.
- Open the Betty Crocker Gingerbread Cake & Cookie Mix and dump it into your mixing bowl. You may find some clumps in your mixture, so use a whisk to break up the mix so it’s light with few clumps.
- Now, add in your butter and water.
- Use your electric mixer to blend the dough together until smooth. If you have a fancy standing mixer, you can definitely use that, but this dough is very light and not super complicated so you can easily get everything well incorporated with a simple electric mixture. (Plus, who passes up an opportunity to lick the beaters?)
- Now, this dough is really soft. You’ll need to refrigerate it for a few hours to bring it to the right consistency to handle. So, put some plastic wrap over the top of the bowl and refrigerate for at least 2 hours (or pop it in the freezer for 30 minutes).
- To get our exact timing, put on the new Chip ‘n’ Dale Rescue Rangers movie on Disney+ and once you’ve laughed your way through the credits, your dough should be just right. Preheat your oven to 375°.
- Time to start molding your cookies! Grab your tablespoon set aside earlier and scoop out a level portion of dough. Roll the dough between the palms of your hands to create small balls. The dough will still be soft and somewhat sticky, so work fast or re-refrigerate as needed.
- Make sure your cookie dough balls are well distanced as they spread while they bake. Our batch made 16 evenly portioned cookies placed out on two cooking sheets.
- Once the oven is preheated, bake, one sheet at a time for 8-10 minutes. Your bake time may vary based on your oven efficiency. We recommend starting out at 9 minutes and then checking and cooking longer if needed. Allow cookies to cool on the baking sheet after removing them from the oven before moving them to a cooling rack. We also recommend placing wax paper or paper towels under the cooling rack to catch crumbs or later, drizzled caramel drops, for easier cleanup!
- After cookies have cooled for at least twenty minutes and are cool to the touch, time to start icing!
- Now you’ll use the Betty Crocker icing. Most of your cookies should be similar in size and shape, but quickly match them up so you have the same size “top” and “bottom” cookie (they are gonna be sandwiches, after all). And you only have to frost half of them.
- Since they are going to be sandwiches, frost the bottom, flat side of the cookie. You can be as generous as you like with the buttercream, but try not to go too overboard, our ambitious frosting attempts in the past led to frosting-sandwich-blowouts and a sweet but regrettable mess.
- Now to make the caramel! The Werther’s bag gives instructions for heating melty caramel for the purpose of caramel apples — but we’re not coating whole apples, we just need enough to drizzle inside our cookie sandwiches.
- We used about 15 caramels, unwrapped them, and placed them in a microwavable bowl. Then added a splash of milk (around one and a half teaspoons) and microwaved for 30 seconds. Using a spoon, we mixed the melted caramel and milk together until smooth. Please be cautious during this part as warm caramel can be messy and burn, so keep an eye on little ones, or accident-prone adults.
- Once you mixed your warm caramel until it’s smooth, use a spoon to drizzle over the frosted half of your cookie sandwiches. This part will be messy, but fun! And since the top of the cookie sandwich will cover everything going on inside, no need for perfection. Again, you can use as much or little caramel as you like, but resist the urge to go overboard and end up with caramel soup (not a bad thing — but not what we’re going for here).
- Once all of your cookies have been properly bedazzled by caramel, apply the cookie tops and let rest on the cooling rack for 5-10 minutes.
- After the caramel has firmed up slightly, they can be eaten immediately or refrigerated for future sweet tooth cravings. We advise refrigerating them on a wax paper-lined baking sheet. Or eating immediately (because that’s why you made them)!

This cookie is a CLASSIC!
If you prefer a chocolatey dessert to end the meal, we’ve got a recipe from Ghirardelli that should satisfy your chocolate cravings.
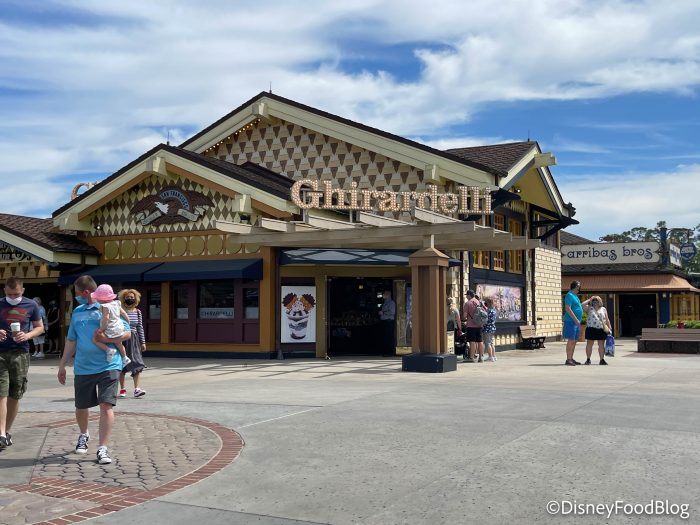
Ghirardelli in Disney Springs
Ghirardelli Chocolate Raspberry Cheesecake
Ingredients:
For Cheesecake:
- 2 cups Ghirardelli 60% Cacao Bittersweet Chocolate Baking Chips
- 4 8-ounce pkg. cream cheese, softened
- 3/4 cup white sugar
- 4 eggs (for cheesecake)
- 1/2 cup raspberry puree (recipe below)
- 1/2 cup heavy cream (for cheesecake)
For Crust:
- 1 1/2 cups graham cracker crumbs (about 10 crackers)
- 1/4 cup ground almonds
- 4 tablespoon white sugar
- 3/4 cup butter, melted
For Puree:
- 1 (10 – 12 oz) pkg. frozen raspberries
- 4 tablespoons white sugar
And if you want to get fancy…
For Chocolate Ganache (Optional):
- 2 tablespoon butter
- 1/2 cup(s) heavy cream
For Garnish (Optional):
- 1 cup fresh raspberries
- 8 ounce Ghirardelli 60% Cacao Bittersweet Chocolate Baking Chips
- 8 ounce Ghirardelli White Chocolate Baking Bar

©D23
Method:
Makes 9 servings
- Preheat over to 325 degrees F (165 degrees C).
- To prepare crust, in a microwave safe bowl, melt the butter.
- Add the chocolate graham crackers, ground almonds, and sugar and mix until combined.
- Press mixture into the bottom of a 9-inch springform pan and set aside.
- To prepare the puree, combine raspberries and sugar in a saucepan. Bring to boil, and continue boiling 3-5 minutes, or until sauce is thick.
- Strain sauce through a mesh strainer to remove seeds and set aside.
- To prepare cheesecake, in a small pot over low heat, bring the whipping cream to just boiling.
- Remove from heat and add the chocolate chips.
- Set aside for 5 minutes and then stir until smooth.
- In a large bowl, mix together cream cheese and 3/4 cup sugar until smooth.
- Beat in eggs, one at a time.
- Remove approximately 1 & 1/2 cup; cup of this batter and place into a smaller bowl and add 1/2 cup raspberry puree. Blend until combined.
- Add the melted chocolate to the remaining batter and mix until combined.
- Pour the chocolate cheesecake batter into the pan.
- Very carefully layer the raspberry cheesecake mixture on top of the chocolate mixture.
- Bake for 60 to 75 minutes, or until filling is set.
- Cool in pan, then cover with plastic wrap and refrigerate until cold before removing from pan.
- If desired, top cooled cheesecakes with one or a combination of the garnishes below.
- Chocolate Ganache: In a small pot over low heat, bring the heavy cream and butter to just boiling. Remove from heat and add the chocolate chips. Set aside for 5 minutes and then stir until smooth. Pour over cold cheesecake to form ganache layer, or drizzle over the cold cheesecake. Refrigerate until it is set.
- Raspberry Puree: Pour remaining raspberry puree over cold cheesecakes. White Chocolate: In double boiler over hot water, melt the white chocolate until smooth. Drizzle over cold cheesecakes. Refrigerate until it is set.
- Fresh raspberries on top or served on the side.
- For Heart Shapes: To make the individual heart shape cheesecakes, prepare the recipe as directed using a 13X9 inch pan instead of a springform pan. Bake for 45-50 minutes. After the cheesecake cools, cut out the hearts using a metal heart shaped cookie cutter.
To show off your beautiful cheesecakes, you may want to get this Tiered Mickey Tray from shopDisney!

©Disney
The 2-tiered tray has one 9″ tray and one 7″ tray, and you can get it for $59.99.
Click here to buy the Tiered Mickey Tray.
The final dessert option is a classic — it’s The Grey Stuff from Disney’s Beauty and the Beast. You can find The Grey Stuff at Be Our Guest Restaurant in Magic Kingdom, and we can confirm that it is in fact delicious.
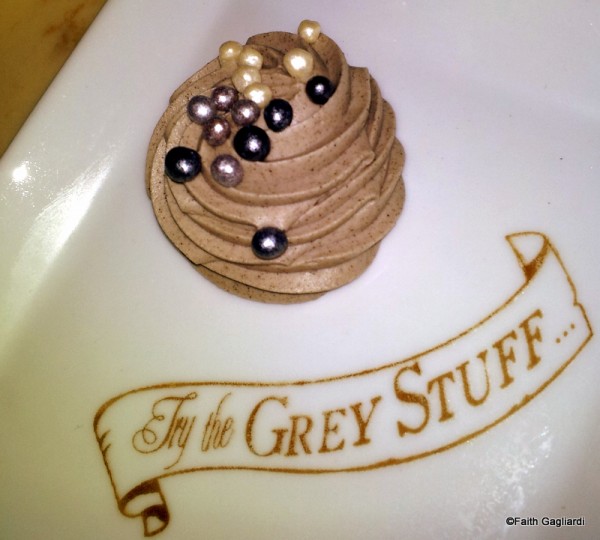
Try The Grey Stuff!
It’s basically cookies and cream mousse served on top of sugar cookies, so this treat is great for kids as well!
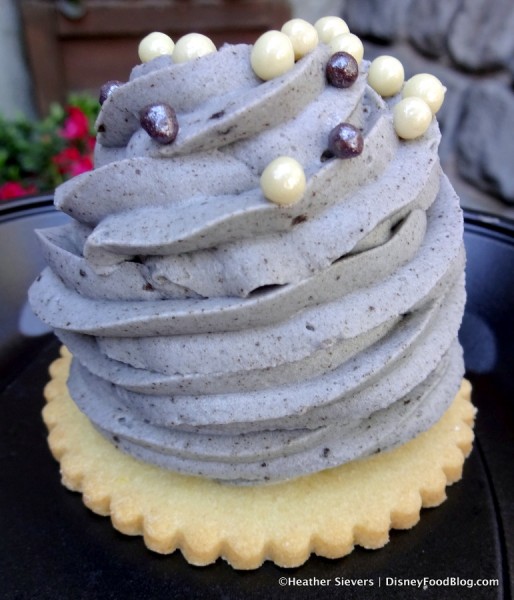
The Grey Stuff from Beauty and the Beast
Ingredients:
- 1 1/2 cups cold whole milk
- 1 (3.4 ounce) package instant vanilla pudding mix
- 15 chocolate sandwich cookies
- 1 (8-ounce) container whipped topping, thawed
- 3 tablespoons instant chocolate pudding mix
- 12 scalloped sugar cookies
- Edible sugar pearls
The Grey Stuff at Disneyland
Method:
- Pour milk into large mixing bowl. Add instant vanilla pudding mix and whisk for 2 minutes until smooth and slightly thickened. Place in the refrigerator for 1-2 hours, until firm.
- Place chocolate sandwich cookies in food processor and pulse until puréed.
- Fold puréed cookies into pudding mix. Stir until fully mixed.
- Add whipped topping and instant chocolate pudding. Stir until fully mixed.
- Place in refrigerator and chill for one hour.
- Spoon grey stuff into piping bag fitted with desired tip. Pipe grey stuff onto cookies. Top with sugar pearls.
And we found the PERFECT way to display your Grey Stuff treats — the Lumiere Cake Stand from shopDisney!
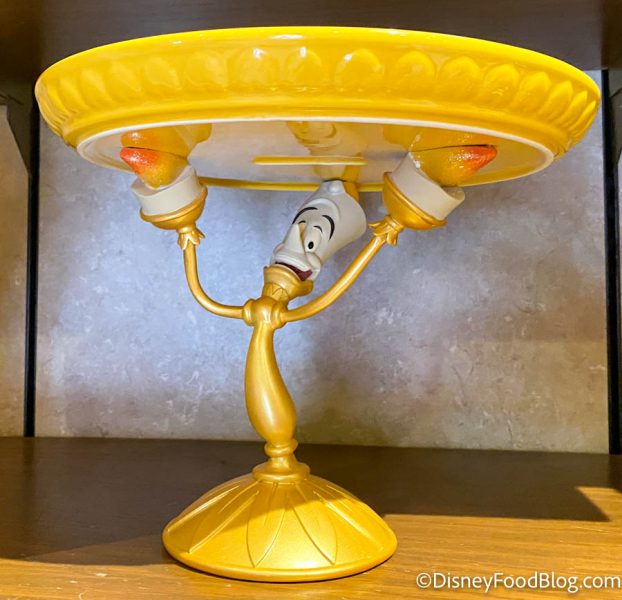
Lumiere Cake Stand
The cake stand is 11″ in diameter and costs $49.99.
Click here to buy the Lumiere Cake Stand.
Cocktails/Drinks
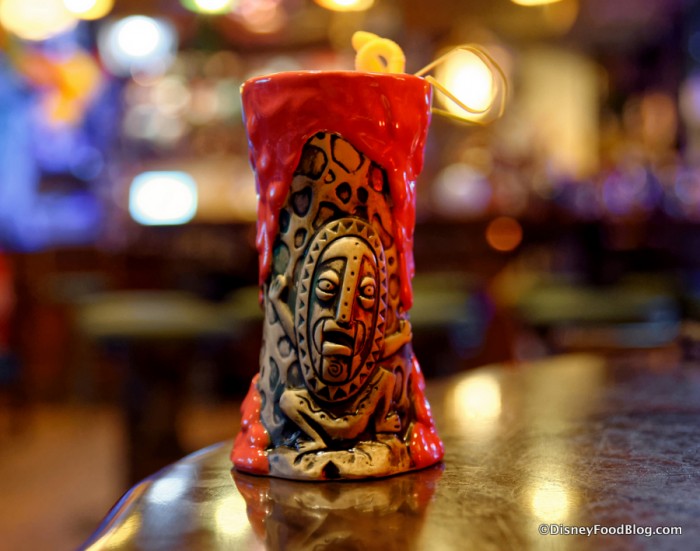
You didn’t think we were done, did you? You can’t have a dinner party without some themed drinks! Whether you’re looking for boozy or non-alcoholic, we’ve got options. The first recipe comes from one of the most popular bars in all of Disney World — Trader Sam’s Grog Grotto.

Trader Sam’s
Check out this recipe for the iconic Krakatoa Punch.
Krakatoa Punch from Trader Sam’s
Ingredients:
- o.5 oz Almond Syrup
- 3 oz Gorilla Grog (a Trader Sam’s specialty made of passion fruit, guava, pineapple, orange, lemon juices, and falernum, a syrup with tons of spices in it!)
- 0.25 oz Hibiscus Grenadine
- 1 oz Aged Rum
- 1 oz Spiced Rum
- Ice
Krakatoa Punch at Trader Sam’s
Method:
Mix all of this in a shaker, and strain over ice!
For a non-alcoholic option, we found a recipe for a smoothie inspired by Disney’s Aladdin.

Jasmine and Aladdin
It’s flavored with banana, dates, and almond butter.
Smoothie Inspired by Aladdin
Ingredients:
- 1 ripe banana
- 5 Medjool dates (pitted)
- 4 tablespoons of almond butter
- 1 1/2 cups of almond milk or oat milk
- 1/4 teaspoon of ground cinnamon
- 1/2 teaspoon of vanilla extract
- 1 cup of ice

A whole new worldddd
Method:
- The first step to making this smoothing is to make sure your dates are soft and pitted! If your dates aren’t soft enough, they won’t blend into the smoothie well. To help soften them up, you can soak them in hot water for 10 minutes.
- Step two is to put all of the ingredients into a blender and blend until it’s smooth enough for you! That’s how you make Genie and Abu’s Banana and Date Smoothie. Sounds easy enough!
We’ve got plenty more recipes for Disney-inspired cocktails, so make sure to check out more here!
Click here to see a list of cocktails inspired by Disney movies.
You might need a Disney-themed glass to serve your drinks in — check out these Mickey tumblers on shopDisney, which we originally spotted in the Mexico pavilion of EPCOT’s World Showcase.
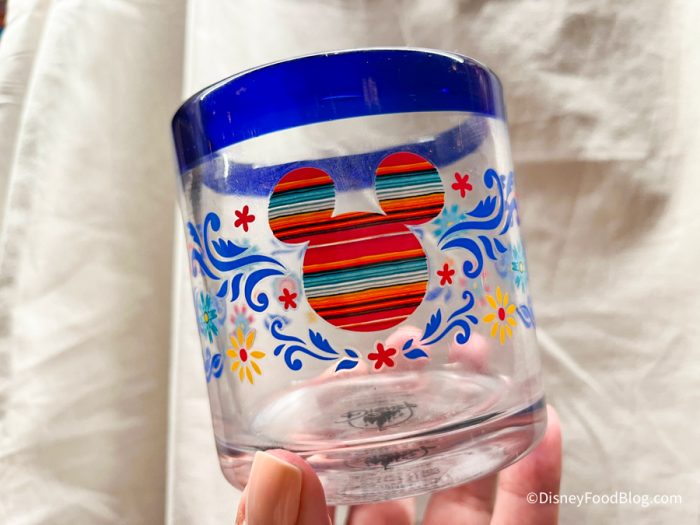
Rocks glass
You can get a 12-oz glass tumbler for $14.99.
Click here to buy the Mickey Tumblers.
Some Extra Essentials
That’s it for all the recipes! We spotted a few extra essentials that might come in handy for your party, though. There’s a classic Mickey Mouse serving bowl on shopDisney that’s good for any occasion.

Mickey Bowl
You can get it for $39.99.
Click here to buy the Mickey serving bowl.
You can also get a full set of Disney princess dishes on Amazon. The 16-piece set comes with 4 dinner plates, 4 salad plates, 4 bowls, and 4 mugs. The dishes are themed to Pocahontas, Moana, Merida, and Snow White.

©Amazon
The set costs $119.99.
Click here to buy the Disney princess dish set.
Or if you want a more subtle Disney look on your plates, check out the Mickey Mouse Dinner Plate on shopDisney.

©Disney
The simple black plates have a Mickey design around the edge and cost $14.99 each.
Click here to buy the Mickey plate.
Now you’re ready to throw the Disney dinner party of the century! We’ll be on the lookout for more Disney recipes, and we’ll also let you know when we create our own (like we did with Disney’s Fuzzy Tauntaun drink!). Stay tuned with DFB for all the latest.
Click here to see MORE Disney recipes.
Join the DFB Newsletter to get all the breaking news right in your inbox! Click here to Subscribe!
Don't Miss Out on Any Disney Fun!
Order Your Copy of the 2022 DFB Guide to Walt Disney World Dining Today!
 With more than 750 pages, the 2022 DFB Guide to Walt Disney World Dining is full of tips and planning tools developed by Disney World experts over 30+ years of visits. We've done the research for you, so you'll know just which spots will uniquely suit your family's needs!
With mini-reviews of every single restaurant, bar, lounge, kiosk and more; an entire chapter on the best snacks in Disney World; full Disney Dining Plan analysis (and how to get FREE dining); and a full chapter on discounts and deals; you'll have everything you need to plan your best vacation yet.
Click here to order your copy of the 2022 DFB Guide to Walt Disney World Dining E-book with code WDW2022 to save 25% off the cover price today!
Use code WDW2022 at check-out for 25% off the cover price today!


Have you tried to make any of these Disney recipes? Let us know in the comments.
The post We Planned Your Next Disney Dinner Party — You’re Welcome 😉 first appeared on the disney food blog.
from the disney food blog https://ift.tt/wumJRQz


Post a Comment